
Overview
Widgetic makes a library of embeddable widgets that your customers can edit using a visual editor.
As a JavaScript developer, you can integrate our widgets directly in your site, platform or CMS, and also connect them to your interface, or use our standard Editor.
This documentation will help you learn the basics of working with our REST APIs.
Glossary
There are a few concepts that you need to master before using the API. These concepts are created around the two core elements: Widget and Editor.
Widget
A widget is any object you can add into a webpage through a snippet of code.
All our widgets are built on top of a Debug Widget, that has a specific structure, a meta theme and a meta content. This allows us to use the Editor for customizing any widget.
Debug Widget
A template widget with a standard arhitecture respected by all widgets on Widgetic.
Dynamic Widget
A dynamic widget is a widget composition created in code that is displayed temporarly, without overwriting the composition widget used to created it.
You would need such a widget if for example you’d have an e-commerce store with 100 products or more. So instead of creating 100 manual compositions, you would create a single composition and always change it’s content when the site loads.
Notes:
- Dynamic widgets cannot be re-embedded.
- To create a dynamic widget, you need to base it on an existing composition.
- The stats are counted for the base widget composition. Assuming your products have different URLs, you would know which dynamic composition the stats apply to, based on the stats URL.
Widget Composition
A composition is the product obtained by customising a widget. A composition represents any widget in it’s ready to use form: has a custom/preset theme, has content, has details and an embed code associated.
COMPOSITION = Theme + Content + Details + Embed Code
Widget Main Attribute
The widgets are grouped in 4 categories, based on their content type, which is their main attribute:
| Category | Uses | File Types |
|---|---|---|
| Photo | galleries, slideshows, banners, etc | jpg, png, gif |
| Audio | audio players | mp3 |
| Video | video players | mp4 |
| Utilities | chart, ticker, calendar, countdown timer, etc | text |
Editor
A three steps panel which allows you to customize a widget by selecting a theme, adding content, editing the details and generating the associated code for embed.
- Step 1: Customize Theme
- Step 2: Add Content
- Step 3: Edit Details
You can however, implement your Editor UI completely from scratch using the Widgetic.js SDK.
Theme
A set of properties specific to each widget (settings, colours) that users can edit. Also called skins, in the API.
Preset Theme
A predefined Theme, created by us, which is available to any user.
Input Controller
An input controller is an input that allows the user to change a specific property of a theme.
These are the Input Controllers available in the Editor:
- Dropdown
- Number
- URL
- RSS
- Text
- Text Area
- Toggle
- Slider
- RangeSlider
- Date and Time
- Location
- Color Picker
- Browser Source
- Position (Pixel Based + Grid Based)
- Order Items
- Font
Content Source
A content source is a web service where the user can host his content.
These are the Content Sources available in the Editor:
- Facebook (photo, video)
- Flickr (photo, video)
- Link (URL) (photo, audio, video)
- DropBox (photo, audio, video)
- Instagram (photo, video)
- Google Drive (photo, video)
- Text (data)
- Browser source (photo, video)
App
A standalone application using the Widgetic API and optionally Widgetic.js, which can bring the power of the Widgetic platform into your project.
Depending on your integration, you can ask users to log into their Widgetic account or you can choose to manage an account on their behalf (and provide them our widgets without the hassle). Authentication is done using the standard OAuth2 protocol.
Users
On Widgetic there can be two types of users, depending on your integration.
Standard Users
Users that own an account on Widgetic. All data (widget compositions, themes, etc) they author is stored in their account.
Using the Widgetic.js SDK, standard users can log into Widgetic Apps using OAuth.
Managed Users
Widgetic accounts created by a Standard User. Managed Users are not able to log into Widgetic (most likely they will not even know they own a Widgetic account). All data they create is managed by the Standard User (you) for them. We call this white label integration.
Managed users receive the same properties of your Standard Account (basic, plus or premium).
Note:
If you don’t ask your users to sign into Widgetic, you must use Managed Users (white label integration). Each Managed User will have his individual data (themes, widget compositions, stats) which you can access with your Standard Account.
API Reference
Summary
The API is organized around the following resources
| API | Resource | Description |
|---|---|---|
| Users | https://widgetic.com/api/v2/users | Get the users profile information |
| Widgets | https://widgetic.com/api/v2/widgets | Access the available widgets |
| Skins | https://widgetic.com/api/v2/skins | Create and update Skins. List skins or access them individually. |
| Compositions | https://widgetic.com/api/v2/compositions | Create and update Compositions. List compositions or access them individually. |
JSON is returned in all responses.
Introduction
The Widgetic API is architected around REST, using standard HTTP verbs to communicate. All responses come in standard JSON.
We also provide a Javascript SDK (Widgetic.js) that enables direct communication with the REST API, user authentication and authorization, and advanced manipulation of embedded widgets.
Getting an Application Key
Including the javascript SDK
<script src="https://widgetic.com/sdk/sdk.js"></script>
Initializing the SDK
// initialize Widgetic with your api key and a redirect uri
        Widgetic.init('<api key>','<redirect uri>');
Widgetic uses API keys to allow access to the REST API. You can register a new app and get an API key at our developer portal.
To interact with the REST API using the Widgetic.js SDK, it must first be initialized with your API key and Redirect URI. The API key is provided on the developer portal. The Redirect URI must point to a webpage on your domain that includes the Widgetic.js SDK. This could be your homepage or an empty html page created for this purpose. The Redirect URI is used for authentication purposes.
Getting an Access Token for an User
You can use Widgetic.js to connect your users to their Widgetic accounts. This allows you to access and manage their widgets and customizations, plus other features available through the API. The authentication and authorization protocol is based on OAuth2.
Interactive login
Triggering login on button click
$('button').on('click', function(){
            // do the interactive (popup) login
            Widgetic.auth().then(
                function(successResponse) {
                    // the user has authorized your app
                    console.log(
                        successResponse.accessToken
                    );
                }, function(failResponse) {
                    // the user has refused authorization or has closed the popup window
                    console.log(failResponse);
                }
            );
        })
Example response
successResponse = {
            status: "connected",
            accessToken: "MjVkOWVlOTJmYzZmNDZmNTJkZDQwMmFkZmIzYTA3YTUyYTg1Mjk2NWU3MWZiNzBjMzFiYmI3M2Y2YTEwMmVjYQ",
            expiresIn: "3600",
            scope: ""
        }
The Javascript SDK has the Widgetic.auth function that initiates and handles the auth process. Calling Widgetic.auth() opens up a login popup where the user can log into (or set up) their Widgetic account and authorize your app. The return value of this function is a Promise object with the then and fail methods. You have to pass callbacks to these functions to get the success or fail response.
Non-Interactive login
Trying a background login
Widgetic.auth(false).then(
            function(successResponse) {
                // the user is logged in and has authorized your app
                console.log(
                    successResponse.accessToken
                );
            }, function(failResponse) {
                // the user is not logged in or the app is not authorized
                console.log(failResponse);
            }
        );
If you pass true to Widgetic.auth, the SDK will try a ‘non-interactive login’ which won’t open any popups. This is useful for checking if the user has already authorized your app and reconnecting to the Widgetic API upon navigation. If the user is logged into Widgetic and has authorized your app in the past, the login process will succeed. Otherwise it will fail and you should prompt the user to do an 'interactive’ login.
Scopes
Scopes let you specify exactly what type of access you need. Scopes limit access for OAuth tokens. They do not grant any additional permission beyond that which the user already has.
Requesting additional scopes
Widgetic.auth(true, ['email', 'skins']);
Available scopes:
| Name | Description |
|---|---|
| (no scope) | Grants read-only access to public information (username, widget compositions, skins) |
| Grants access to the users email | |
| skins | Grants write access to the users skins |
| compositions | Grants write access to the users widget compositions |
API calls
API entry point URL
https://widgetic.com/api/v2
Example of an api call
Widgetic.api('users/me').then(function(user) {
            console.log('Hello ' + user.username);
        })
After the user has logged in (i.e. you have an access token) you can start making api calls on their behalf.
To communicate with the REST API you use the Widgetic.api function.
Widgetic.js
Widgetic.js is our javascript SDK which enables advanced widget features (popups and overlays, in-place edit, responsiveness, and future functionality), user authentication, cross-domain REST api calls, and direct widget manipulation.
User
You can get profile information about the current authenticated user. You can also create and work with managed user accounts, to allow white-label integration.
Get User info
Resource endpoint
GET /users/me
Getting the logged in user’s info
Widgetic.api('users/me')
            .then(function(user) {
                console.log('Hello ' + user.username);
            })
Example response
{
          "id": "51277df103a25c7a34000000",
          "username": "user",
          "email": "email@example.com"
        }
Retrieve information about the logged in user. Useful for “Sign in with Widgetic” functionality. By default the response is limited to their Widgetic unique ID and their username. To get the email info you must request the email scope during the authorization step.
Widgets
The main currency of Widgetic. You can query our collection of widgets and use the information to create embeddable compositions. All widgets allow advanced customization of the UI. The customizations can be saved as skins (themes). Each widget comes with a predefined set of skins, called presets.
The widget object
Example response
{
            "id": "542945dc09c7e2ab6c8b4567",
            "name": "Accordion With Text",
            "slug": "accordion-with-text",
            "category": "util",
            "previews": {
              "full": "/assets/uploads/widgets/previews/acordeon_ca_la_turci.png",
              "large": "/assets/uploads/widgets/previews/acordeon_ca_la_turci.png",
              "small": "/assets/uploads/widgets/previews/acordeon_ca_la_turci_mic.png"
            },
            "contentMeta": {},
            "skinMeta": {},
            "skins": [],
            "width": 560,
            "height": 600
          }
Attributes
| Field | Description |
|---|---|
| id | |
| name | |
| slug | |
| category | The category of the widget (photo, audio, video, util) |
| previews | A collection of preview images, showcasing the widget |
| contentMeta | The content meta, a hash describing the keys and value restrictions expected by the widget for it’s content objects |
| skinMeta | The skin meta, a hash describing the widget’s skin schema |
| skins | User’s skins and presets |
| width | The default width |
| height | The default height |
Get all widgets
Resource endpoint
GET /widgets
Getting the list of widgets’ names
Widgetic.api('widgets', {'fields': ['name']})
            .then(function(widgets) {
                console.log(widgets);
            })
Query the available widgets.
Query Parameters
| Parameter | Description |
|---|---|
| fields | Limit the fields |
| max-results | Limit the number of results |
| sort-by | A field to sort the results by |
Get a widget
Resource endpoint
GET /widgets/{id}
Getting the name of a widget
Widgetic.api('widgets/5195f3ec1d8a0c7a17000000')
            .then(function(widget) {
                console.log(widget.name);
            })
Get a widget by id.
Skins
The design and behaviour of all widgets can be customized using skins. Each widget has its own properties, defined in the skin meta.
Presets
Getting a widget’s presets
var widgetId = '5404451409c7e20b0d8b4567'

        Widgetic.api('skins', {widget_id: widgetId})
            .then(function(skins) {
                var presets = skins.filter(function(skin) {
                    // test if the id ends with the widget id
                    var isPreset = new RegExp(widgetId + '$', 'i');
                    isPreset = isPreset.test(skin.id)
                    return isPreset
                })

                console.log(presets)
            })
Presets are pre-made skins that are created by the Widgetic staff for each widget. You can choose to use any of them for your embeds or use them as a base for your own customizations. Rest assured that the presets available when creating your composition will be available permanently (slight adjustments might be made to fit widget updates).
Presets are retrieved from the same endpoint as skins, or by way of the widget's skins attribute. You can distinguish presets from skins from the structure of the id. Presets have the widget’s id concatenated to their own (p1_5404451409c7e20b0d8b4567).
The skin meta
Getting a widget’s skin meta
Widgetic.api('widgets/5404451409c7e20b0d8b4567')
            .then(function(widget){ console.log(widget.skinMeta) })
Example response
{
              "tabs": {
                "Interface": {
                  "backgroundcolor": {
                    "control": "core/controls/color",
                    "options": {
                      "help_text": "Select the color and transparency for the widget's background.",
                      "label": "Background Color",
                      "default": "#ffff"
                    }
                  },
                  "scrollColor": {
                    "control": "core/controls/color",
                    "options": {
                      "help_text": "Select the color and transparency for the scroll's background.",
                      "label": "Scroll Color",
                      "default": "#ffff"
                    }
                  },
                  "distanceBetweenImages": {
                    "control": "core/controls/stepper",
                    "options": {
                      "help_text": "Set the distance between any two images.",
                      "label": "Distance Between Images",
                      "default": 3,
                      "unit": " px",
                      "min": 0,
                      "max": 300
                    }
                  }
                }
              }
            }
The skin schema is defined per widget, as each widget requires different attributes for its skin. This schema is accessible on the widget object skinMeta attribute.
| Field | Description |
|---|---|
| tabs | A hash that describes each of the widget’s attributes, grouped by function. The keys are the names of the skin’s attributes. The values contain other metadata related to value restrictions and descriptions |
Tabs
| Field | Description |
|---|---|
| control | An identifier for the control that will handle validation and UI rendering in the editor |
| options | Various options used for the control |
Get all skins and presets
Resource endpoint
GET /skins
Getting the names of a widget’s skins
Widgetic.api('skins', {widget_id: '542173f409c7e222028b4568'})
            .then(function(skins) {
                skins.map(function(skin) {
                    console.log(skin.name, skin.id)
                })
            })
Get all the skins and presets for a given widget.
Preset id’s have the widget id concatenated to it’s own id: id_widgetId
Query Parameters
| Parameter | Description |
|---|---|
| widget_id | The widget id to filter the skins |
Save a new skin
Resource endpoint
POST /skins
Creating a new skin, using a preset as the base
// request the widgets' skins
        Widgetic.api('skins', {widget_id: '5108dcefe599d12e6f000000'})
            .then(function(skins) {
                // select the first skin
                return skins[0];
            }).then(function(skin) {
                // edit some properties
                skin.name = "My red skin";
                skin.backgroundcolor = "#ff0000";

                // save as a new skin
                return Widgetic.api('skins', 'POST', JSON.stringify(skin));
            }).then(function(skin) {
                // use the saved skin
                console.log('Skin ' + skin.id + ' saved!');
            })
To create a new skin you must first create an object that has all the keys and values corresponding to the widget’s skinMeta schema. The object must also contain the widget_id key to identify the widget for which this skin is intended.
The response is a skin object with the data that was sent to the API and the new id of the resource, for later use.
Get a skin
Resource endpoint
GET /skins/{id}
Getting the details of a previously created skin
Widgetic.api('skins/5108dcefe599d12e6f000000')
            .then(function(skin) {
                console.log('This is the ' + skin.name + ' skin.');
            })
Get a skin from the server by referencing it by it’s id.
Update a skin
Resource endpoint
PUT /skins/{id}
Updating a previously saved skin
var mySkin = { id: "553622bb09c7e25d158b4571" };
        var resourceURL = 'skins/' + mySkin.id;

        // get the skin resource
        Widgetic.api(resourceURL).then(function(skin) {
                mySkin = skin;
                // change skin properties
                mySkin.name = "My edited skin";
                // issue a PUT request to update the skin
                return Widgetic.api(resourceURL, 'PUT', JSON.stringify(mySkin));
            }).then(function(skin) {
                console.log('The skin is now called ' + skin.name + '!');
            })
To update a skin you must send a PUT http request with the full representation of the skin resource, including the modification.
Delete a skin
Resource endpoint
DELETE /widgets/{id}
Deleting a skin
Widgetic.api('skins/' + mySkin.id, 'DELETE')
            .then(function() {
                console.log('The skin has been deleted.');
            })
To delete a skin, you must issue a DELETE http request.
Compositions
To create an embeddable widget you construct a composition resource, linking a widget, a skin and the desired content. This allows easy embedding and facilitates content updates. Compositions can be created using the Widgetic Editor, but you can also build them manually, ensuring you adhere to the schema.
The composition object
Example composition
 {
            "id": "5549b54947749318327b23c8",
            "name": "My Composition",
            "content": [
                {
                    "id": "c-1",
                    "order": 1,
                    "image": "https://widgetic.com/assets/widgets/demo/Images/Vertical/image02.jpg",
                    "target": "_blank"
                },
                {
                    "id": "c-2",
                    "order": 2,
                    "image": "https://widgetic.com/assets/widgets/demo/Images/Food/image05.jpg",
                    "target": "_blank"
                }
            ],
            "skin_id": "p4_5404451409c7e20b0d8b4567",
            "widget_id": "5404451409c7e20b0d8b4567",
            "width": 560,
            "height": 355
        }
Attributes
| Field | Description |
|---|---|
| id | |
| name | |
| content | An array of content objects, with fields and values corresponding to the widget’s content schema |
| widget_id | References the widget |
| skin_id | The skin or preset used for customizing the widget’s looks |
| width | The dimensions the embed should load with. Actual behavior depend upon the embed resize option used |
| height |
The content meta
Getting a widget’s content meta
Widgetic.api('widgets/5404451409c7e20b0d8b4567')
            .then(function(widget){ console.log(widget.contentMeta) })
Example response
{
            "options": {
                "min": 1,
                "max": 15,
                "mainAttribute": "image"
            },
            "attributes": {
                "image": {
                    "control": "core/controls/image",
                    "options": {
                        "help_text": "",
                        "placeholder": "Add URL to image file (jpg, jpeg, png, gif)",
                        "readonly": true,
                        "preview": true
                    }
                },
                "href": {
                    "control": "core/controls/url",
                    "options": {
                        "help_text": "Select a page to open on image click.",
                        "placeholder": "Add Link",
                        "label": "Web Address"
                    }
                },
                "target": {
                    "control": "core/controls/dropdown",
                    "options": {
                        "label": "Add Link Target",
                        "help_text": "Select the window in which the link will open if clicked.",
                        "default": "_blank",
                        "options": [
                            { "label": "_blank", "value": "_blank" },
                            { "label": "_top", "value": "_top" }
                        ]
                    }
                }
            }
        }
The content schema is defined per widget, as each widget requires different attributes for it’s content items. This schema is accessible on the widget resource’s contentMeta attribute.
| Field | Description |
|---|---|
| options | Meta information related to the content |
| attributes | A hash that describes each of the widget’s attributes. The keys are the names of the attributes, as required when defining the composition’s content items. The values contain other metadata related to value restrictions and descriptions |
Options
| Field | Description |
|---|---|
| min | The minimum number of content items |
| max | The maximum number of content items |
| mainAttribute | The name of the required attribute. All of the other attributes are optional |
Attributes
| Field | Description |
|---|---|
| control | An identifier for the control that will handle validation and UI rendering in the editor |
| options | Various options used for the control |
Controls
These are the Input Controllers available in the Editor:
- Dropdown
- Number
- URL
- RSS
- Text
- Text Area
- Toggle
- Slider
- RangeSlider
- Date and Time
- Location
- Color Picker
- Browser Source
- Position (Pixel Based + Grid Based)
- Order Items
- Font
Get all compositions
Resource endpoint
GET /compositions
Getting the compositions list
Widgetic.api('compositions', {widget_id: '51d57c5a1d8a0cee4a000000'})
            .then(function(compositions) {
                console.log('You have ' + compositions.length + ' saved compositions!')
            })
Retrieve the users’ saved compositions.
Query Parameters
| Parameter | Description |
|---|---|
| widget_id | The widget id to filter the compositions |
Create a new composition
Resource endpoint
POST /compositions
Creating a new composition
var newComp = {
            name: 'My new composition',
            content: [
                {
                  id: 0,
                  image: 'http://placehold.it/200x200',
                  order: 0
                },
                {
                  id: 1,
                  image: 'http://placehold.it/200x200/ff33cc',
                  order: 1
                }
            ],
            skin_id: 'p1_51d57c5a1d8a0cee4a000000',
            widget_id: '51d57c5a1d8a0cee4a000000'
        };

        Widgetic.api('compositions', 'POST', JSON.stringify(newComp))
            .then(function(composition) {
                console.log('You have saved the ' + composition.id + ' composition!')
            })
To create a composition you must first decide on the widget and skin to use. Construct an object according to the composition schema. The content attribute must contain an array of content items. Each content item must contain a unique (in the context of the array) id, an order field (used for sorting the items in the widget UI) and the attributes defined in the widget’s content schema, of which only the mainAttribute is required.
HTTP Request
POST /compositions
Get a composition
Resource endpoint
GET /compositions/{id}
Getting the name of a composition
Widgetic.api('compositions/553758d509c7e2334a8b458a')
            .then(function(composition) {
                console.log('The composition is called ' + composition.name);
            });
Get a composition by it’s id.
Update a composition
Resource endpoint
PUT /compositions/{id}
Updating a composition
// get the composition resource
        Widgetic.api('compositions/553758d509c7e2334a8b458a')
            .then(function(composition) {
                // update some properties
                composition.width = 200;
                composition.height = 200;

                // save the modified resource
                return Widgetic.api('compositions/' + composition.id, 'PUT', JSON.stringify(composition))
            }).then(function(composition) {
                console.log('Composition ' + composition.id + ' has been updated.')
                console.log('New dimensions are: '+ composition.width +'x'+ composition.height +' .')
            });
Update an existing compositions’ properties.
Delete a composition
Resource endpoint
DELETE /compositions/{id}
Deleting a composition
Widgetic.api('compositions/553758d509c7e2334a8b458a', 'DELETE')
            .then(function() {
                console.log('The composition has been deleted!')
            }).fail(function() {
                console.log('The composition does not exist!')
            });
Delete an existing composition.
Errors
HTTP Responses
The API uses HTTP responses to indicate success or otherwise of API requests. The codes listed below are often used, and the API may use others. Note that 4xx and 5xx responses may be returned for any request and clients should cater for them.
| Response Code | Description |
|---|---|
| 400 | Bad Request – General client error, possibly malformed data. |
| 401 | Unauthorized – The API Key was not authorised (or no API Key was found). |
| 402 | Payment Required – The API is not available on your current plan. |
| 403 | Forbidden – The request is not allowed. |
| 404 | Not Found – The resource was not found. |
| 405 | Method Not Allowed – The resource does not accept the HTTP method. |
| 406 | Not Acceptable – The resource cannot return the client’s required content type. |
| 408 | Request Timeout – The server would not wait any longer for the client. |
| 409 | Conflict - the client is trying to update with a stale version or data. |
| 415 | Unsupported Media Type - The server doesn’t accept the submitted content-type. |
| 422 | Unprocessable Entity – The data was well-formed but invalid. |
| 500, 502, 503, 504 | Server errors - something went wrong with Widgetic’s servers. |
Examples and guides
Embedding your first widget
Widgetic allows multiple embed options. We recommend using the anchor + sdk method, as it is really simple and allows use of advanced features (out-of-widget popups and overlays).
anchor + sdk
anchor + sdk embed
<script type="text/javascript" src="https://widgetic.com/sdk/sdk.js"></script>

        <a href="https://widgetic.com/widgets/photo/mosaic-gallery/" class="widgetic-composition" data-id="555b5e6509c7e29e718b4569" data-width="500" data-height="500" data-resize="allow-scale-down" data-brand="bottom-right">Mosaic Gallery Widget</a>
The default embed mechanism. Recommended for simple use-cases. It allows multiple auto-scaling options, specifying default dimensions, and control of the branding position.
The embed code is featured on the composition’s page. Just copy and paste the code to the desired location on the website and the Widgetic SDK will transform the anchor tag into the actual widget.
You can choose the resize behaviour using the data-resize attribute.
iframe
iframe embed
<iframe src="https://widgetic.com/embed/555b5e6509c7e29e718b4569?bp=top-right" width="500" height="500" frameborder="0" style="visibility:hidden;" onload="this.style.visibility='visible';"></iframe>
The most basic embed mechanism. The iframe embed does not support the auto resize options and advanced widget features (popups and overlays, edit in place, widget API). It is only recommended for websites where you cannot include the Widgetic SDK.
dynamic
dynamic embed
Widgetic.UI.composition(document.querySelector('.embed'), composition)
The most advanced of the embed methods. Allows embedding of compositions, but also dynamic creation of compositions with skin and content defined at runtime. Useful for content management systems, websites built using a templating language, etc.
embed resize options
All of the widgets are responsive and you can choose the way they resize by selecting one of the resize options.
| Option | Behaviour |
|---|---|
| fixed | The widget does not scale. It maintains the specified width and height. |
| fixed height | The widget only scales horizontally to 100% of it’s container’s size, keeping the height fixed. |
| fill | The widget scales horizontally and vertically to 100% of it’s container’s size. |
| fill width | The widget scales to 100% of it’s container’s width while maintaining the defined aspect ratio. |
| allow scale down | The widget only scales down, keeping the aspect ratio. It never scales above the defined width and height. |
Only the anchor+sdk and the dyanmic embeds support all resize options. The iframe embed is fixed.
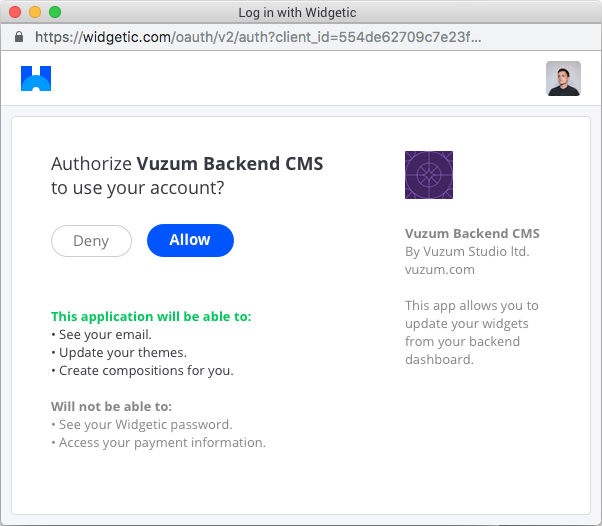
Login with Widgetic
Using interactive login
<button>Login with Widgetic!</button>
        <p style="display:none"> Hello <span>visitor</span>! </p>
// initialize the sdk with your api key
        Widgetic.init('554de62709c7e23f7f8b4567_4bgmtqx250aoookowwook40gk0408s4gs8w0o4o8o0cc4cscc8', 'http://docs.widgetic.com/examples/proxy.html');

        var hideButton = function() {
          $('button').off('click').hide();
        }

        var showUsername = function() {
          $('p').show();
          Widgetic.api('users/me').then(function(user) {
            $('span').text(user.username);
          })
        }

        var showError = function() {
          console.log('Login failed');
        }

        $('button').on('click', function() {
          // do the interactive login
          Widgetic.auth()
            .then(hideButton)
            .then(showUsername)
            .fail(showError)
        })
To start working with any REST API, one of the first steps is always authentication. Widgetic uses the OAuth 2.0 protocol for authentication and authorization. Thus, most API endpoints require an access token to allow interaction. Widgetic supports common OAuth 2.0 scenarios such as those for web server and client-side applications.
The Widgetic.js SDK contains helper functions for handling the OAuth flow and retrieving a valid access token. To begin, obtain OAuth 2.0 client credentials from the Widgetic Developers Area. The SDK needs to be initialised with your API Key.
Calling Widgetic.auth when the user interacts with your app starts the interactive login process, using popups. The user will be greeted by your apps authorization screen. They can choose to authorize or deny access to their Widgetic account. Like most of the Widgetic SDK functions, Widgetic.auth returns a promise. Using the then and fail methods you can subscribe callbacks to be run when the user authorizes or denies authorization, respectively.
Using non-interactive login to reconnect the user
var doInteractiveAuth = function() {
          var def = Widgetic.Aye.defer()

          console.log('Background login failed; reverting to interactive login');

          $('button').show().off('click').on('click', function() {
            Widgetic.auth()
              .then(def.resolve)
              .fail(def.reject)
          });

          return def.promise;
        }

        function init() {
          Widgetic.auth(false)
            .fail(doInteractiveAuth)
            .then(hideButton)
            .then(showUsername)
            .fail(init)
        }

        init()
The other form of the Widgetic.auth function, invoked using the false parameter, will do a background non-interactive login, which succeeds only if the user has previously authorized your app and they are still logged into the Widgetic platform.
You can use this form to reconnect to a user’s account upon page refresh.
Using the REST API to create a composition
Listing the available widgets
Widgetic.api('widgets', {fields: ['id, name']})
          .then(function(widgets) {
            console.log(widgets);
          });
In this tutorial we’ll create a composition using the API.
The first step is to decide on a widget to use. We’ll call the Widgetic.api method to interact with the /widgets endpoint and get the list of widget names.
Listing the Mosaic Gallery’s skins
var getMosaicGallery = function() {
          return Widgetic.api('widgets', {fields: ['id, name']})
            .then(function(widgets) {
              // find the mosaic gallery
              return widgets.filter(function(widget) {
                return widget.name === 'Mosaic Gallery'
              })[0]
            })
            .then(function(mosaicGallery) {
              console.log('The id of the Mosaic Gallery Widget:');
              console.log(mosaicGallery.id);

              console.log('Getting the details!');
              return Widgetic.api('widgets/' + mosaicGallery.id);
            });
        }


        getMosaicGallery()
          .then(function(mosaicGallery) {
            return mosaicGallery.skins[0];
          })
          .then(function(skin) {
            console.log('The first skin:');
            console.log(skin)
          });
Let’s use the Mosaic Gallery widget. To create a composition we need a widget, a skin and some content. We can build a custom skin or use one of the presets. Let’s select a preset for now. We’ll get the skins from the widget/{id} endpoint.
Listing the Mosaic Gallery’s content meta
getMosaicGallery()
          .then(function(mosaicGallery) {
            console.log('The content meta of the Mosaic Gallery Widget:');
            console.log(mosaicGallery.contentMeta);
          });
We have the widget and the skin. All we need now is some content. Each widget expects the content to adhere to a different content schema.
By looking at the options.mainAttribute we deduce that the content items must contain an image property. The attributes.image.control property informs us that an image control will be used for validation. This is the minimum knowledge we need to construct a valid content collection.
Getting the errors
getMosaicGallery()
          .then(function(mosaicGallery) {
            var newComp = {
                name: 'My new composition',
                widget_id: mosaicGallery.id,
                skin_id: mosaicGallery.skins[0].id,
                content: [
                  {
                    something: "wrong"
                  }
                ]
            };

            return Widgetic.api('compositions', 'POST', JSON.stringify(newComp))
          })
          .then(function(composition) {
            console.log('Your composition has been saved!')
            console.log(composition);
          })
          .fail(function(errors) {
            console.log(errors);
          })
Using this information, let’s have a first attempt at creating and saving a composition. We’ll experiment a bit by sending some content which does not conform to the schema.
The Widgetic API tries to return useful error information to ease app development. We can catch and handle these errors on the .fail branch of the api calls.
Saving the composition
getMosaicGallery()
          .then(function(mosaicGallery) {
            var newComp = {
                name: 'My new composition',
                widget_id: mosaicGallery.id,
                skin_id: mosaicGallery.skins[0].id,
                content: [
                    {
                      id: 0,
                      image: 'https://widgetic.com/assets/widgets/demo/Images/Vertical/image02.jpg',
                      order: 0
                    },
                    {
                      id: 1,
                      image: 'https://widgetic.com/assets/widgets/demo/Images/Vertical/image01.jpg',
                      order: 1
                    }
                ]
            };

            return Widgetic.api('compositions', 'POST', JSON.stringify(newComp))
          })
          .then(persist('rest-example-comp'))
          .then(function(composition) {
            console.log('Your composition has been saved!')
            console.log(composition);
          })
          .fail(function(errors) {
            console.log(errors);
          })
With this information we are ready to create the composition object.
Embedding the composition
<div class="embed"></div>
composition = retrieve('rest-example-comp')
        Widgetic.UI.composition(document.querySelector('.embed'), composition)
Congratulations! You’ve created your first composition using the REST API. Here it is embedded in it’s full glory.
Building a custom editor
This is a sample project showcasing the use of the Widgetic SDK to build a custom editor for a widget.
Get the source code at https://github.com/widgetic/sample-custom-editor.
Building a custom CMS
This is a sample project showcasing the use of the Widgetic SDK to build a custom CMS panel.
Get the source code at https://github.com/widgetic/sample-quick-cms.
Resources
Terms and Conditions
You have to follow a set of rules and standard practices for using the Widgetic API. Failing to do so might result in your app being banned.
Roadmap
Building our API is an ongoing effort and we rely on your feedback for what to focus on next. If you don’t see a resource you want here, please let us know!
Documentation
- add Widgetic.js examples
- add curl examples
- add details about server-side authentication
- document managed accounts
- document optional, required attributes
API
- support JSON schema for all resource types, including content items to ease creation and validation
Help
Are you stuck? Let us know how we can help at support@widgetic.com
API Terms of Use
INTRODUCTION
Before diving into the legal language, we'd like to share our expectations and aspirations regarding Widgetic's API.
- Widgetic believes that content will continue to play an important role in digital. As opposed to traditional media where content is displayed in a static manner (newspapers, magazines), or non‐interactive (tv, radio), the digital world comes with the ability for content to be interactive. This means that users are able to interact with the content ‐ basically to perform an action for the content to respond.
- There are many reasons why users would want to interact with the content, but most of the times they do it is because they want to see the content (video, images), hear the content (audio), or understand the content (data).
- The elements that make the content interactive are called widgets. Every audio or video player, gallery, chart, or social feed are all part of this category.
- Our goal is to make interactive content consumption easy by offering a variety of widgets, and fun by providing a set of tools and services to non-technical people.
- With our tools, anyone can create and personalize their content. With our services, they can identify and amplify their best content across devices and platforms.
- We believe in the power of APIs to unleash the talents of developers around the globe to build new applications that extend Widgetic's utility and help build the world's best widgets as a service platform. The Widgetic API provides access to the entire widgets library and tools.
- Widgetic supports developers, and we want them to prosper. Some developers will build apps for fun, and others will do it to make money. We want developers to be able to earn money to support their efforts in making applications using Widgetic.
- We are trying to build Widgetic into a profitable and lasting company. Thus, there are several important guidelines in our APIs related to "commercial use". Please pay particular attention to those sections.
Thank you for being part of Widgetic. If you have any questions, contact us at support@widgetic.com. We welcome you and look forward to working with you.
API TERMS OF USE
The Terms apply to your use of www.widgetic.com, including any successor sites, (the "Website") and any and all data, text, software, documents and other materials on the Website ("Content") associated with the application programming interface offered through the Website (currently available at http://widgetic.com/developers/ for selected premium accounts) (the "API"). Registered users of the Website ("Widgetic Users") may upload Content to the Website.
By using the Widgetic APIs, you or the entity or company that you represent ("Developer" or "You") are unconditionally agreeing to be bound by the following terms and conditions, including those available by hyperlink from within this document, and are becoming a party to this API Terms of Use Agreement (collectively, the "Terms"). If you disagree with any of these terms, Widgetic does not grant you a license to use the Widgetic APIs. We reserve the right to update and change these terms from time to time without notice. You can always find the most recent version of these terms on this page.
1. API Licensed Uses and Restrictions
Subject to full compliance with the Terms, Widgetic SRL ("Widgetic") hereby grants You a limited, personal, non‐sublicensable, non‐transferable, non‐exclusive, revocable license to access and use the API solely as necessary to create and run websites and applications (collectively, "Applications") that meet all the requirements and conditions set forth in the Terms. Widgetic user content is owned by the users and not by Widgetic.
You shall:
- Comply with the Widgetic Terms of Service at https://widgetic.com/terms‐of‐service and the Widgetic Privacy Policy at https://widgetic.com/privacy‐policy.
- Comply with any requirements or restrictions imposed on usage of the content by their respective owners. Remember, Widgetic doesn't own the content ‐ Widgetic users do. Although the Widgetic APIs can be used to provide you with access to your managed users content, neither Widgetic's provision of the Widgetic APIs to you nor your use of the Widgetic APIs override the owners' content requirements and restrictions. In ALL cases, you are solely responsible for making use of Widgetic content in compliance with the owners' content requirements or restrictions. If you use Widgetic content for a commercial purpose, it must be agreed upon between you and the owner.
- Be solely responsible for all aspects of Your Application and any content appearing therein, and for providing all customer support to end‐users relating to Your Application.
- Be truthful and honest about the Application to Widgetic and Your users.
- Create Managed Users for each individual user of Your Application that is using Widgetic, if they are not required to sign in / sign up to Widgetic (white label integration). Each Managed User's data (widgets, themes, stats) is accessible by your Standard Account only.
You shall not:
- Use the API for any Application that competes with, or replicates the essential user experience of www.widgetic.com, it’s subdomains, or any plugin released by Widgetic.
- Attempt to circumvent any security measures or technical limitations of the API.
- Use the API in a manner that exceeds reasonable request volume or constitutes excessive or abusive usage. Users are allocated by default, 10,000 calls per day.
- Attempt to cloak or conceal your identity or your application's identity when requesting authorization to use Widgetic APIs.
- Display more than 100 Widgetic widgets per page in your application or use an unreasonable amount of bandwidth.
- Use the Widgetic APIs for any application that constitutes, promotes or is used in connection with spyware, adware, or any other malicious programs or code.
- Use the Widgetic APIs in any manner or for any purpose that violates any law or regulation, or any rights of any person, including but not limited to intellectual property rights, rights of privacy, or rights of personality.
- Use Widgetic as a generic hosting service.
- Use the Widgetic APIs in a manner that adversely impacts the stability of Widgetic.com servers or adversely impacts the behavior of other applications using the Widgetic APIs. Further, we reserve the right to rate limit or block applications that make a large number of calls to the API that are not primarily in response to direct user actions.
- Sell, lease, or sublicense the API or access thereto.
- Modify, decompile, extend, subset or superset the API or otherwise alter the API to any extent.
- Transmit spam or upload, post or otherwise transmit Content that is inaccurate, harmful, obscene, defamatory, racist or is otherwise offensive to others.
- Disparage Widgetic or knowingly tarnish the name reputation, image or goodwill of Widgetic in connection with Your Application or participation in the API program.
ALL RIGHTS NOT EXPRESSLY GRANTED IN THE TERMS ARE HEREBY RESERVED BY WIDGETIC AND ITS LICENSORS.
2. Attribution
- You shall not use or alter any text, logos, Widgetic's Trademarks, Widgetic's signature colors, Widgetic's layout, or a confusingly similar layout to Widgetic's layout in such a way which may suggest endorsement or affiliation by Widgetic.
- Any use of the Widgetic logo or Widgetic's Trademarks must be used in its entirety and must not be altered or used in a misleading way.
- Any use of the Widgetic logo or Widgetic's Trademarks in Your Application shall be less prominent than the logo or mark that primarily describes the Application and Your use of the Widgetic logo shall not imply any endorsement or affiliation by Widgetic.